I have an NOS dash going in my convertible, which means I need to cut the single hole for the Top switch.
I believe the assembly manual has the location and dimension data, but how can I cut a sharp square hole without scratching the rest of that aluminum trim or buggering up the plastic dash? Anyone done one before?
I've done a few when installing an NOS aluminum trim plate. Did you buy a trim plate NOS or the whole dash bezel including the trim plate? I did mine by measuring the bezel (see the shop manual for cutout locations) and then carefully using a Dremel. I cut the holes about 80% the size they specify with the Dremel and then I use a small flat fine steel file to gradually enlarge the hole while concurrently centering it perfectly. This is especially important if you have more than one switch, so they all line up nicely.
The factory opening allows for a little play. I leave the hole smaller so you have to press fit the switch, this way you don't need the retaining clip. If you ever have to remove a switch later you will be eternally grateful for not having those retainers, nearly impossible to remove them, especially while the dash is in the car.
Thanks - mine is the whole dash cluster bezel with trim plate installed, not just the aluminum band. I don't think I can take it off (they're glued if I recall).
I put masking tape over my bezel, but one slip of the dremel and your screwed. Maybe using a large drill and then filing from there is safer. The dealers had a set of punches that did a perfect job, never seen a set for sale though.
I started and aborted the process last night. Scary as hell, to be honest, because it's not like I can order up another dash and I'm 1mm from disaster at most points...
I started with a dremel but might switch tools, I'm not sure. I might switch to a normal drill bit as well, the dremel bits I had did not inspire confidence. They kind of just wander around on the metal and then melt the plastic.
Especially not great because I'm going through a sheet of metal AND two layers of plastic. No damage done yet, but I need to think on this a bit.
I'm almost thinking tiny cuttoff wheel. I think I'll practice some more on a spare dash I have.
-- Edited by davepl on Thursday 26th of April 2018 09:03:43 AM
There must be some sort of specialty fabrication shop in your area that would have specialized tools for doing such a cut. I'd look into doing that than risk damaging the dash.
Practicing on your old panel (there are two other potential option holes) sounds like a great idea. When I do these on GTO's, Firebirds and Grand Prix's (they all use the same switches as the big cars) it's a piece of cake because the bezels are plastic with wood grained vinyl overlay. Those ones I run a little propane torch and use it to preheat the small blade on a pen style box cutter and carve a hole 80% as big as I need and then file my way to the ideal size and location of the opening.
I'd go with the small cutoff wheels on the Dremel tool. Should be very easy, but mask everything off as the grit may get everywhere. If memory serves me right, the cutoff wheels are Dremel #409.
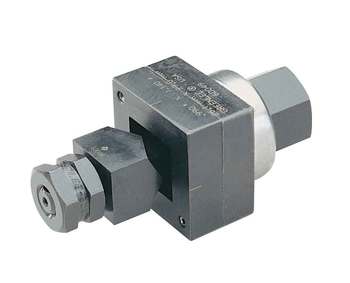
I'm thinking there is a specialized tool for this. Seem to remember you drill a small hole and then position a male and a female square die on either side of the piece. A bolt thru the dies is then tightened and it pops a square hole.
Hope I've explained it properly.
No doubt there is a rectangular hole punch, but finding one of the right dimensions might be a trick! I wound up with a Dremel and file. When I was done it was snug but a touch crooked, so I had to loosen it up a little with a file, so now I'll need a retainer.
"Prepare the Laser"
- I actually do have a CNC laser, but it's only 2W, so it would melt the black plastic but never touch the aluminum!
-- Edited by davepl on Friday 27th of April 2018 09:19:51 AM
Power top switches are failure prone and unlike a rear defroster or something you must be able to get the top up. Those retainers are impossible to remove without mangling things under the dash.
The dealers used a two piece punch, they started by drilling a center hole then you'd install the punch from both sides and then tighten a nut on the outer side till it punched out the hole. I've never seen one for sale but they must be out there, every dealer must of had a bunch and Pontiac had almost 4,000 dealers just in the US in the 60's.
When I was working we has a Greenlee set of knock-out punches of various square and rectangular sizes that were used to create panels for rocker switches and computer plug-ins.
Works well, although may not be practical to purchase for just one application.
Well, I either need a retainer or tape or something!
I "rebuilt" the guts of the switch because I didn't like the looks of the replacements available and this one stuck and didn't "return" from one direction, and was sticky the other. It was your basic "take everything apart as far as it'll go, clean everything to like new and lubricate and reassemble" and it worked. So it should be good for a another 50 years (or 2 weeks, we'll see).
Those punches would work great (I have round ones), but they're not cheap. Here's $562 for a 9-pin connector. If they were wicked sharp they'd be the right tool though!
-- Edited by davepl on Monday 30th of April 2018 09:47:07 AM