looking good Eric you must be getting real close to starting that Big Block up..Break ins are scary stuff I;am crossing my fingers and hoping for the best bud,,keep us informed
Clint, yes that is the intake I got from you. Looks really good where it's sitting. Thanks Again.
When it came to the fuel sender, I was under the delusion that GM used the same sender tank fitting diameter across it's vehicle lines. I was mistaken. Hence why I ended fabbing the adapter. As hind site is 20/20, getting a correct sender and adding the return line may be easier. Next time...
Spent the day fitting an A body exhaust system to my B body. The pipes i used were a Flow Master 3" header back with some inexpensive 24" Jegs turbo style mufflers.
The over axle pipe was extended by 6" after the turn up behind the muffler.
The other change I made was to remove the 45degree elbows on the 2 pieces that would make the head pipe and then joined them.
The slight offset brings the exhaust nearly perfectly under the exhaust clearance under the cross member.
T
Once over the axle the tail pipes exit just after the rear wheels.
Pretty slick and amazing that with a few changes how well the exhaust fits.
I notice in this first picture of this thread a '68 Cutlass ... what's the story with it?
__________________
Prince Edward Island
'64 Parisienne CS "barn find" - last on the road in '86 ... Owner Protection Plan booklet, original paint, original near-mint aqua interior, original aqua GM floor mats, original 283, factory posi, and original rust.
Yesterday was a frustrating day which showed no progress for the effort involved.
First was the install of what I thought was a good wiper motor from a parts car that was on the road a year before I got it. It did not work. Confirmed electrical was fine up to the motor. Removed it and tore it apart. Long story short the end bushing on the armature is seized and wont loosen up.
Next project was the exhaust leak at #8. Replaced the gasket, did not fix it. Made some 3/8 plate C shaped washers to load the flange better. That didnt work. Pull the header off. The gaskets are square opening and the header is a round. The bottom corners barely sealed and #8 had a small spot of no overlap on the bottom. I pulled the mig welder out and added material into the offending corners and ground smooth. Reinstalled with another gasket and the header sealed up perfectly.
Ultimately I will need to source round opening header flange gaskets.
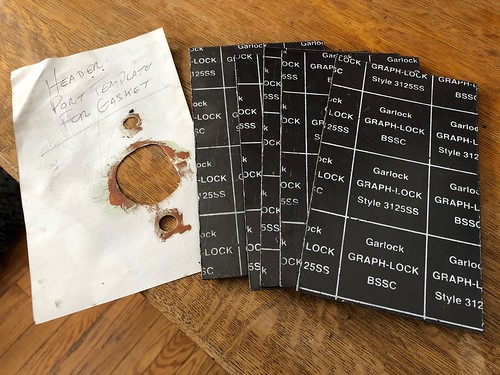
Eric, for what it's worth, after being disappointed with pre made gaskets, and how they did not seem to match, fit and seal to the port/header, I made up my own matching gaskets for my 496. I used Garlock Graph-Loc material. Its a 1/8" thick sheet, flexible stainless foil sandwiched in between two sheets of Graphite.
I made a pattern/template, the sheet can be cut with a utility knife. The bolt holes can be punched out with a hole punch backed with a piece of wood. Made 8 individual small gaskets. Installed once and they never leaked, and the bolts never loosened. On each gasket I punched one hole blind, one slotted so the gasket could be slipped in, a bolt passed through the blind hole, then the gasket could pivot down onto the second bolt.
Imop, owing to all the different port/header combinations, you could not buy a better sealing gasket than making them yourself to fit exactly from this material.
I can send you enough to do your own nc.
Cheers, Mark
__________________
65 Laurentian post, 67 Grande Parisienne 4 door HT.
It's been some time since I last posted an update. Last spring I removed the rear glass and the last of the rear of the headliner to find that most of the window channel at the top was rusted away along with major rot along the sides and bottom. I lost the desire to work on the 2+2 until before Christmas and repaired the rear opening with the rear section of roof that I purchased from Ken, Cheviac. I spent the some time grafting in healthy metal and replacing some of the inner bracing to restore the structural integrity.
Thanks to 40 years of mice living in the roof of the car the windshield header was soft. It too need to rebuilt. Another trip to see Cheviac and retrieve the rest of the roof to extract the bracing to rebuild the upper windshield opening.
The foxes patrolling our property are doing a great job this winter. Not a week doesn't go by without me seeing a fox with one or two mice in it's mouth.
__________________
Prince Edward Island
'64 Parisienne CS "barn find" - last on the road in '86 ... Owner Protection Plan booklet, original paint, original near-mint aqua interior, original aqua GM floor mats, original 283, factory posi, and original rust.
From the years of sitting the door sills had it pretty tough. I sand blasted the surface, put down a few heavy coats of epoxy primer followed with some single stage paint.