I figure I'll kind of document the repair as it comes along. Every car probably suffers some form of this.
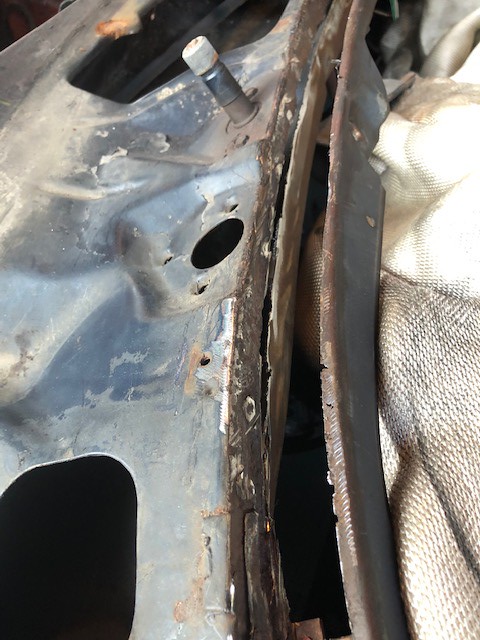
Got the hard sealer out from around the window. Looks like the glass has been out, and an attempt to reseal it was done, evidenced by the sticky sealer. Along with some very poor epoxy repair towards the lower sides. The pillars and top channel appear very good. The lower is basically shot all the way across with the worst in the center and the ends. I'll record some measurements as to how the windshield sits before pulling it.
So here is picture number 1,
__________________
65 Laurentian post, 67 Grande Parisienne 4 door HT.
'64 Parisienne CS "barn find" - last on the road in '86 ... Owner Protection Plan booklet, original paint, original near-mint aqua interior, original aqua GM floor mats, original 283, factory posi, and original rust.
I'm wondering what the best course of action would be? I have access to what appears to be a fairly intact cowl section. Do I attempt to cut away and replace the entire section, or do I just fab small sections and fit them in as I go across? Small diy sections might be far easier. Really, cosmetics need not apply here, just a good structure that can properly support and allow for a good seal.
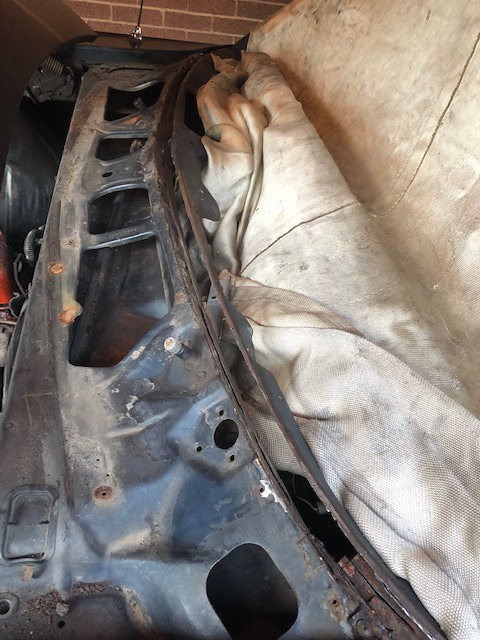
Here's some shots of that cowl. I feel with this type, you can't really know the condition of the lower channel until the glass is out, or at least the surround sealer has been picked/broken out.
While it looks ok, there is some rust visible. Look at the little seam line just below the glass edge, if it looks kind of prominent, there might be rust in it bulging it open.
Anyone know the purpose of the small plastic pieces at the bottom corners? Held on by 2 Phillips screws. The screws and the remains of the tabs were all that were left of mine.
The plastic pieces could be stops that the glass sits on to properly position the windshield in the opening. I have seen them on newer cars but usually on the bottom of the windshield, not at the corners.
Paul
I was thinking the same as Paul, that they were supports for the windshield. I had a similar problem with my 66 Parisienne. I went with the piece meal since I wasn't able to find anything in better shape. At some point someone had filled the bottom with bondo the entire length but didn't drill the drain holes.
I noticed those on my black car too. I am guessing they deflect water away from a sensitive area but that's just a guess. And as to your other question, I'd do small sections like you stated. Not that I'm an expert though!
__________________
1966 Strato Chief 2 door, 427 4 speed, 45,000 original miles
1966 Grande Parisienne, 396 1 of 23 factory air cars
I hadnt thought of a water deflector. I friend had a 99 Buick and had the windshield resealed twice for a water leak. The passenger floor was always wet after a heavy rain. The third time he went to the dealer with the problem. The service manager said he knew what the problem was and gave a price to fix it. Apparently there is a water deflector glued to the bottom of the windshield to stop water running into the heater box. He said it was common to be missed on a windshield replacement.
Paul
CDN Pont, Yours doesn't look too bad (but sometimes it gets uglier the deeper you dig). First impression on yours is that I'd just fab small bits to replace the soft areas rather than tackling the finding and changing out of an upper cowl.
Thanks to you Mark, I will now be cutting the full windshield channel out of my parts car as insurance!
__________________
Prince Edward Island
'64 Parisienne CS "barn find" - last on the road in '86 ... Owner Protection Plan booklet, original paint, original near-mint aqua interior, original aqua GM floor mats, original 283, factory posi, and original rust.
I think a full cowl change is beyond what I can tackle. So yes, it's going to be a piecemeal repair. I dont think it really needs to be pretty anyway. Just close enough that the glass fits right, preserved so it lasts, and watertight.
But if you have a clean parts channel, I would be definitely be cutting it out before scrapping the shell.
Now I just need to find some time to get at it. We all know how it goes...summers here! I'll now have all the time I need...right.
__________________
65 Laurentian post, 67 Grande Parisienne 4 door HT.
'64 Parisienne CS "barn find" - last on the road in '86 ... Owner Protection Plan booklet, original paint, original near-mint aqua interior, original aqua GM floor mats, original 283, factory posi, and original rust.
I was looking for any metal on a windshield channel for a B body for my car on google. And surprisingly this came up! This is what mine looks like, except a lot worse on the drivers side, its actually gone/nothing there. And was curious how to shape it if nothing is there...
Post some shots of your issues Mike, and maybe we all can suggest something of a plan.
I just basically dug in and went at it, cut it all away, pieced and bridged it all together. Took about 4 days. Not pretty, but it's certainly solid and shouldn't leak.
But it was a milestone job, that felt really good to get out of the way.
__________________
65 Laurentian post, 67 Grande Parisienne 4 door HT.
I didnt get the chance to work on it last time so no pics. Maybe this weekend. Is it easier if I can find a channel? And would a 67 GP channel be okay to work with?
Looks like you are up against exactly the same condition Mike. A complete channel change would probably be a job for a pro shop, and would take some serious hours.
It's a situation here that basically you have to pull the glass, clean it all up to see what you have, cut it all out and piece it in. You can't be fussy here, it's a git er done kind of job. However, one important thing is to try to maintain the depth, angle and curve of the glass channel bed, along with the distance across to the dash structure. Get it wrong and you'll likely struggle with sealing and getting the reveal molding to sit right. Make a template when the glass is out, you can use to check it as you weld in. Start in the middle with your first brace to the dash structure and work out. Use zinc rich weld through primer on all your pieces both sides. I went with pieces no longer than 8 inches at a time and worked them into a slight curve as I went along. I blew through a ton of times, but just kept at it and filled them all with weld. Used seam sealer across it all but the sealing surface.
Make sure ALL your glass is protected from grinder sparks.
My job left much to be desired, but should at least keep the water out.
Here's a simplified diagram of basically what was done,. I basically opened up the seam and inserted a vertical piece into the gap, then bridged across that piece to the dash structure.
Thanks Mark for the info. After reading that. I think it's a job that I don't feel comfortable tackling. And just makes me think maybe I should leave the car with a resto shop... I don't know of any shops near by that would only do this channel job. Most keep saying they want the whole project. Now I'm really confused on what to do...
Mike, if I had the time and a proper shop I'd certainly help you out here when I could. But I have a carport, and my time is spoken for for at least into the fall.
It's a bitch of a job, and to be truthful, if it wasn't for it being a labor of love on this car, I would not have bothered with the whole project.
__________________
65 Laurentian post, 67 Grande Parisienne 4 door HT.